Django Rest Framework 및 Nuxt Auth에서 Google 소셜 로그인을 빌드하고 JWT 토큰을 새로 고치는 방법 1 부
Nuxt 및 Django에서 종단 간 소셜 로그인 화면 구축 개요 지난 몇 주 동안 저는 사이드 프로젝트를 진행해 왔습니다. 요구 사항 중 하나는 사용자가 Google 소셜 로그인을 사용하여 애플리케이션에 로
ichi.pro
Django와 Vue의 Social Login을 연동하는 방법이다. Wagtail은 Django 기반이기 때문에 사용방법이 동일하다. (다만 Wagtail에서는 views.py를 사용하지 않기 때문에 일부 수정이 필요하다.)
1. Nuxt App Build
튜토리얼대로 진행해보겠다.
환경은 python 3.8로 진행했다. 필요 module은 진행하면서 설치할 계획이다.
1) 먼저 project 폴더를 생성해주자.
mkdir google-login
cd google-login
2) front라는 이름의 vue 프로젝트를 생성해주자.
npm init nuxt-app frontend3) 아래와 같이 설정을 진행하면 된다.
? Project name: google-login
? Programming language: JavaScript
? Package manager: Npm
? UI framework: Buefy
? Nuxt.js modules: enter를 눌러주자
? Linting tools: enter를 눌러주자
? Testing framework: None
? Rendering mode: Universal (SSR / SSG)
? Deployment target: Static (Static/JAMStack hosting)
? Development tools: enter를 눌러주자
? What is your GitHub username? sdil
? Version control system: Git
Vue에 대해서 자세하게 다루는 글이 아니기 때문에 세부설정에 대한 설명은 하지 않겠다.
4) nuxt auth와 axios를 설치해주자.
cd frontend
npm install --save-exact @nuxtjs/auth-next
npm install @nuxtjs/auth-next @nuxtjs/axios
5) nuxt.config.js 수정
frontend/nuxt.config.js
  modules: [
    // https://go.nuxtjs.dev/buefy
    'nuxt-buefy',
    '@nuxtjs/axios',
    '@nuxtjs/auth-next',
  ],
  auth: {
    strategies: {
      google: {
        clientId: 'to be added'
      }
    }
  },
위와 같이 설정을 바꿔주자.
6) login.vue 작성
frontend/pages/login.vue
<template>
  <section class="section">
    <b-button @click="loginWithGoogle()" icon-left="google">
      Sign in with Google
    </b-button>
  </section>
</template>

<script>
export default {
  methods: {
    loginWithGoogle() {
      this.$auth.loginWith("google");
    },
  },
};
</script>
Social Login을 위한 Google로그인 버튼을 생성했다.
7) protect.vue 작성
frontend/pages/protected.vue
<template>
  <section class="section">
      {{ $auth.user.email }}
  </section>
</template>

<script>
export default {
  middleware: 'auth'
};
</script>
Nuxt Auth 미들웨어를 활성화 했다. 사용자가 로그인했을 때만 Page에 Access 할 수가 있다. 로그인 하지 않으면 사용자가 로그인 페이지로 Redirection 된다.
8) 작동 Test
nuxt dev

# 문제가 발생하는 경우에는 npm install nuxt -g
9) localhost:3000/login 이동
login 버튼을 생성해 놓은 login page로 이동해서 google login 버튼을 누르면 400 승인 오류가 발생할 것이다. 걱정할 필요 없다. 아직 Google OAuth 설정을 하지 않았기 때문이다.
2. Wagtail API 서버 구축
1) wagtail 설치, 프로젝트 생성
cd ../
pip install wagtail
wagtail start backend
cd backend
backend라는 Wagtail project를 생성해주었다.
2) 필요 모듈 설치
pip install django-rest-framework dj-rest-auth django-allauth django-cors-headers
pip install djangorestframework-simplejwt
3) App 생성
python manage.py startapp social_login4) views.py 수정
Wagtail에서는 views.py을 사용하지 않으므로 이후 수정이 필요하다고 생각된다. 허나 지금은 튜토리얼대로 그대로 따라해볼 생각이다.
backend/social_login/views.py
from allauth.socialaccount.providers.google.views import GoogleOAuth2Adapter
from dj_rest_auth.registration.views import SocialLoginView
from allauth.socialaccount.providers.oauth2.client import OAuth2Client
from django.conf import settings

class GoogleLogin(SocialLoginView):
    authentication_classes = [] # disable authentication
    adapter_class = GoogleOAuth2Adapter
    callback_url = "http://localhost:3000/login"
    client_class = OAuth2Client
5) urls.py 수정
backend/backend/urls.py
from django.contrib import admin
from django.urls import path, include
from social_login.views import GoogleLogin

urlpatterns = [
    path('admin/', admin.site.urls),
    path('auth/', include('dj_rest_auth.urls')),
    path('social-login/google/', GoogleLogin.as_view(), name='google_login'),
]
6) settings/base.py 수정
backend/settings/base.py
INSTALLED_APPS = [
     'django.contrib.sessions',
     'django.contrib.messages',
     'django.contrib.staticfiles',
     "social_login",
     "rest_framework",
     "rest_framework.authtoken",
     "corsheaders",
     "django.contrib.sites",
     # Auth & social auth
     "dj_rest_auth",
     "allauth",
     "allauth.account",
     "dj_rest_auth.registration",
     "allauth.socialaccount",
     "allauth.socialaccount.providers.google",
 ]

SOCIALACCOUNT_PROVIDERS = {
    'google': {
        'SCOPE': [
            'profile',
            'email',
        ],
        'AUTH_PARAMS': {
            'access_type': 'online',
        }
    }
}

# Disable email verification since this is just a test.
# If you want to enable it, you'll need to configure django-allauth's email confirmation pages
SOCIALACCOUNT_EMAIL_VERIFICATION = "none"
SOCIALACCOUNT_EMAIL_REQUIRED = False

REST_USE_JWT = True

SITE_ID = 1

from datetime import timedelta

SIMPLE_JWT = {
    'ACCESS_TOKEN_LIFETIME': timedelta(minutes=5),
    'REFRESH_TOKEN_LIFETIME': timedelta(days=7),
    'ROTATE_REFRESH_TOKENS': True, # IMPORTANT
    'BLACKLIST_AFTER_ROTATION': True, # IMPORTANT
    'UPDATE_LAST_LOGIN': True,
}

MIDDLEWARE = [
    "corsheaders.middleware.CorsMiddleware",
    'django.middleware.security.SecurityMiddleware',
    'django.contrib.sessions.middleware.SessionMiddleware',
    'django.middleware.common.CommonMiddleware',
    'django.middleware.csrf.CsrfViewMiddleware',
    'django.contrib.auth.middleware.AuthenticationMiddleware',
    'django.contrib.messages.middleware.MessageMiddleware',
    'django.middleware.clickjacking.XFrameOptionsMiddleware',
]

CORS_ORIGIN_ALLOW_ALL = True
CORS_ALLOW_CREDENTIALS = True

# Rest Settings
REST_FRAMEWORK = {
    "DEFAULT_PERMISSION_CLASSES": ("rest_framework.permissions.IsAuthenticated",),
    "DEFAULT_AUTHENTICATION_CLASSES": (
        "rest_framework.authentication.BasicAuthentication",
        "rest_framework.authentication.SessionAuthentication",
        "dj_rest_auth.utils.JWTCookieAuthentication",
    ),
}

DEFAULT_AUTO_FIELD = 'django.db.models.BigAutoField'
7) migrations 실행
python manage.py makemigrations
python manage.py migrate
3. Google OAuth 설정
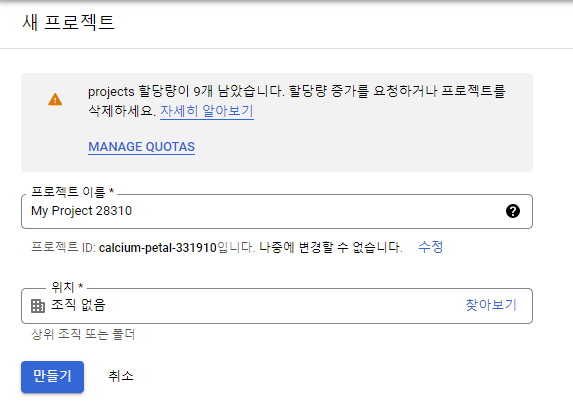
1) Google Cloud Platform 접속
https://console.cloud.google.com/apis/dashboard
위 사이트로 이동하자.
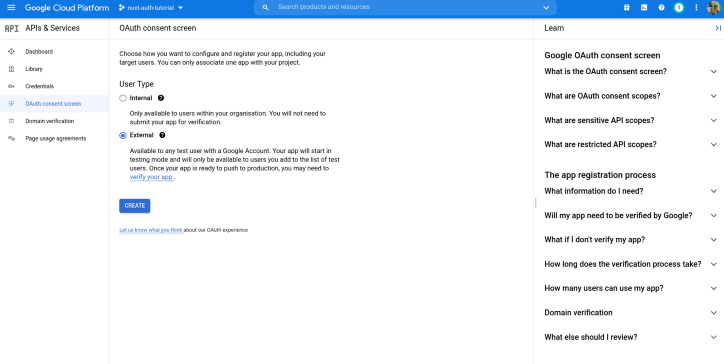
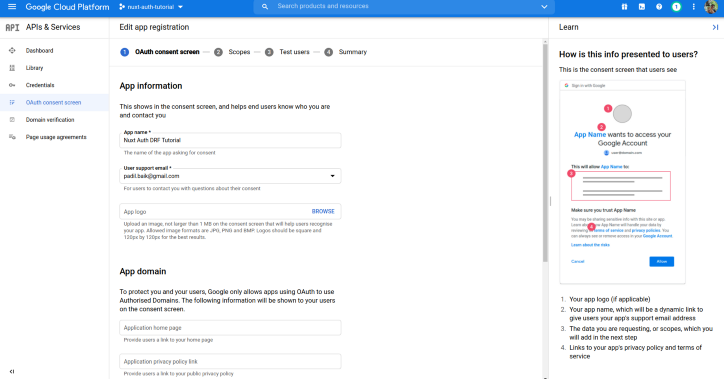
2) OAuth 설정
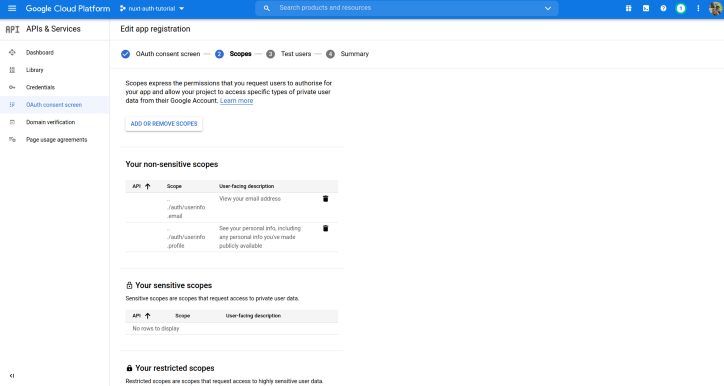
이후 외부를 클릭한 뒤, 앱 이름, 이메일을 입력하고 저장하기를 누른다.
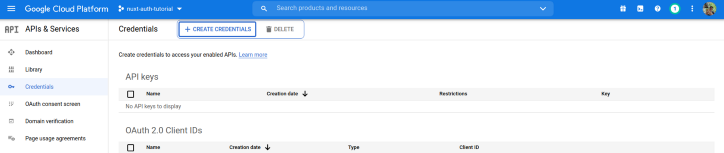
동의가 완료 되었으면 사용자 인증 정보를 클릭한다.
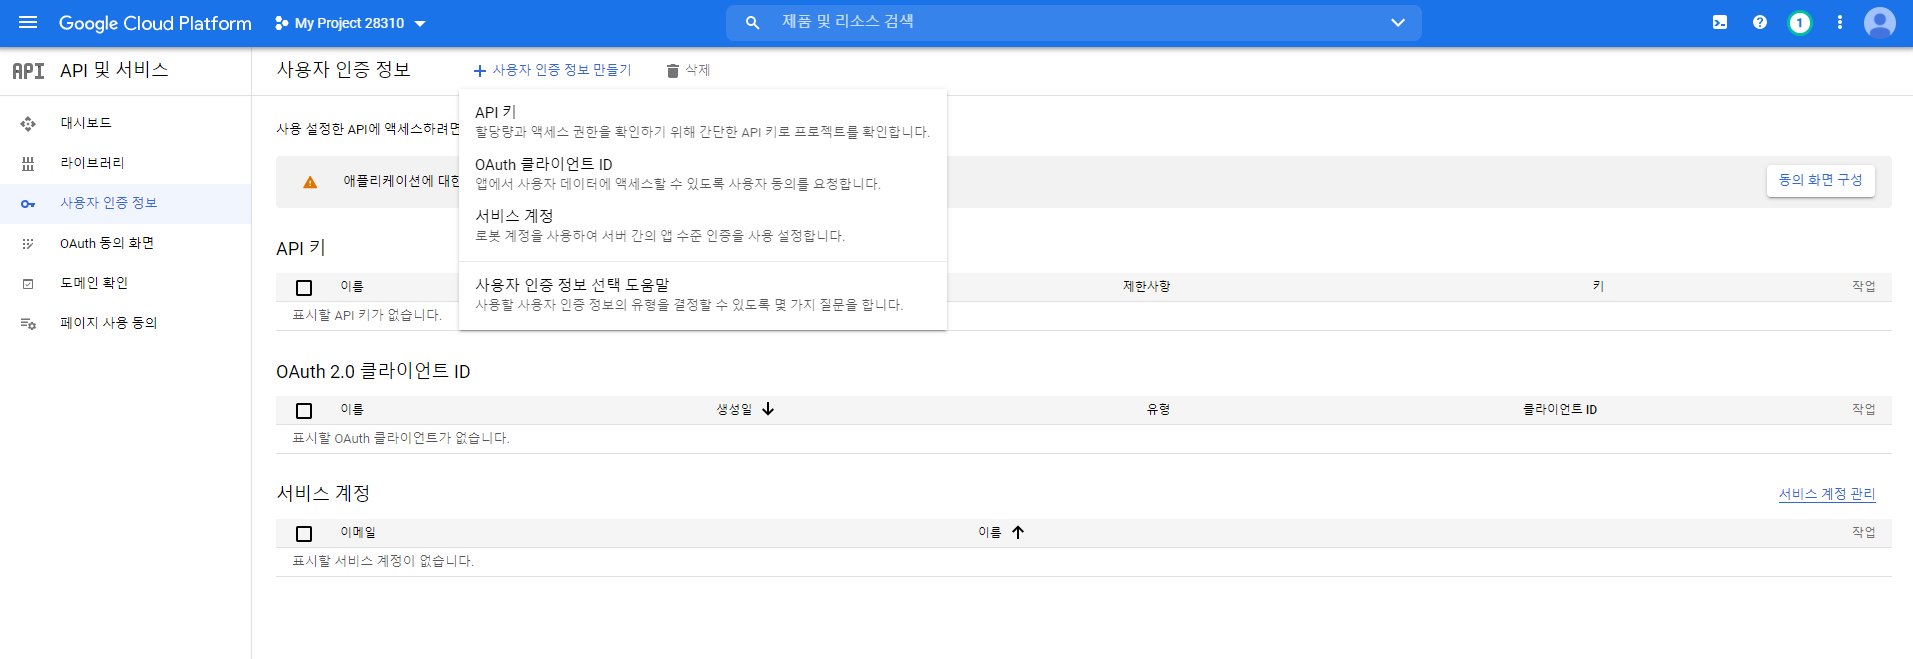
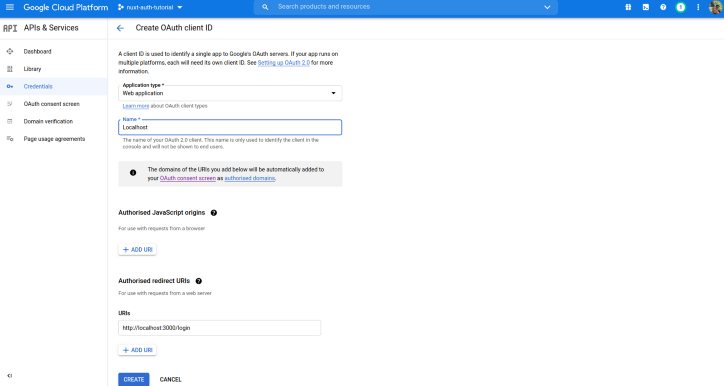
OAuth 클라이언트 ID를 클릭하고 애플리케이션 유형을 웹 애플리케이션으로 설정한다. (이름은 알아서 설정)
URI 설정은 다음과 같이 하고 저장을 누른다.
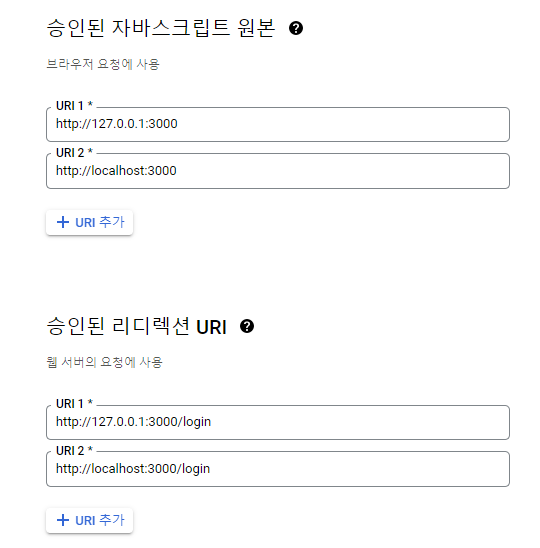
그러면 자신의 클라이언트 ID와 비밀번호가 나올 것이다. 메모장에다가 저장해놓자.
4. Nuxt 앱에 Google 클라이언트 ID 추가
클라이언트 ID 추가
frontend/nuxt.config.js
  auth: {
    strategies: {
      google: {
        clientId: '클라이언트 ID',
        codeChallengeMethod: '',
        responseType: 'code',
        endpoints: {
          token: 'http://localhost:8000/social-login/google/',
          userInfo: 'http://localhost:8000/auth/user/'
        },
      },
    }
  },
클라이언트 ID는 아까 google에서 생성한 클라이언트 ID를 넣으면 된다.
5. Django 앱에 Google 클라이언트 ID 및 비밀번호 추가
1) create superuser
cd backend
python manage.py createsuperuser
Username (leave blank to use 'fadhil'): admin
Email address: admin@test.com
Password:
Password (again):
Superuser created successfully.
슈퍼 유저를 생성해주자.
2) django-admin 페이지 접속
localhost:8000/django-admin으로 접속한다.
로그인을 한 뒤
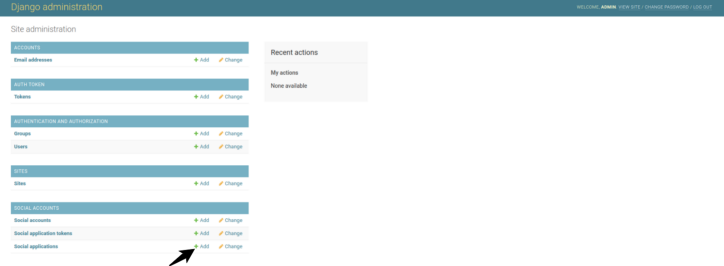
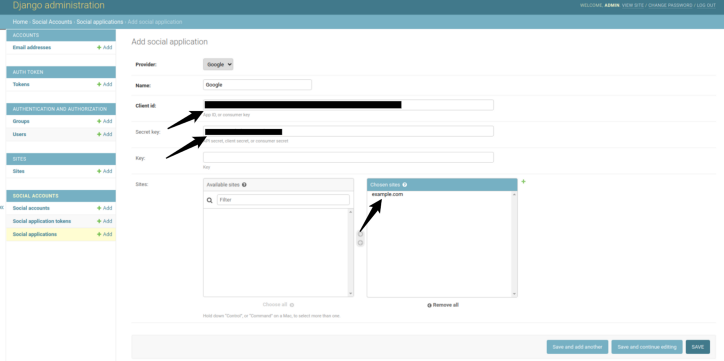
다음과 같이 설정을 진행해준다.
이제 완료되었다. 로그인을 진행한 뒤 wagtail admin으로 들어가보면 user가 등록되어 있을 것이다.
'Back-End > Wagtail, Django' 카테고리의 다른 글
| Wagtail BaseSetting (0) | 2021.11.15 |
|---|---|
| Wagtail Debug Toolbar(+ Django) (0) | 2021.11.13 |
| Wagtail Rich Editor 기능 추가 (0) | 2021.11.06 |
| Wagtail Admin Page 한글 설정 (0) | 2021.11.04 |
| Wagtail Form (0) | 2021.11.02 |

